OAuth 2
How to setup OAuth 2?
OAuth 2.0 provider based on oauthlib is built into frappe. Third party apps can now access resources of users based on Role and User permission system. To setup an app to access
OAuth 2 defines four roles
resource owner
An entity capable of granting access to a protected resource. When the resource owner is a person, it is referred to as an end-user.
resource server
The server hosting the protected resources, capable of accepting and responding to protected resource requests using access tokens.
client
An application making protected resource requests on behalf of the resource owner and with its authorization. The term "client" does not imply any particular implementation characteristics (e.g., whether the application executes on a server, a desktop, or other devices).
authorization server
The server issuing access tokens to the client after successfully authenticating the resource owner and obtaining authorization.
Setup OAuth 2 Provider
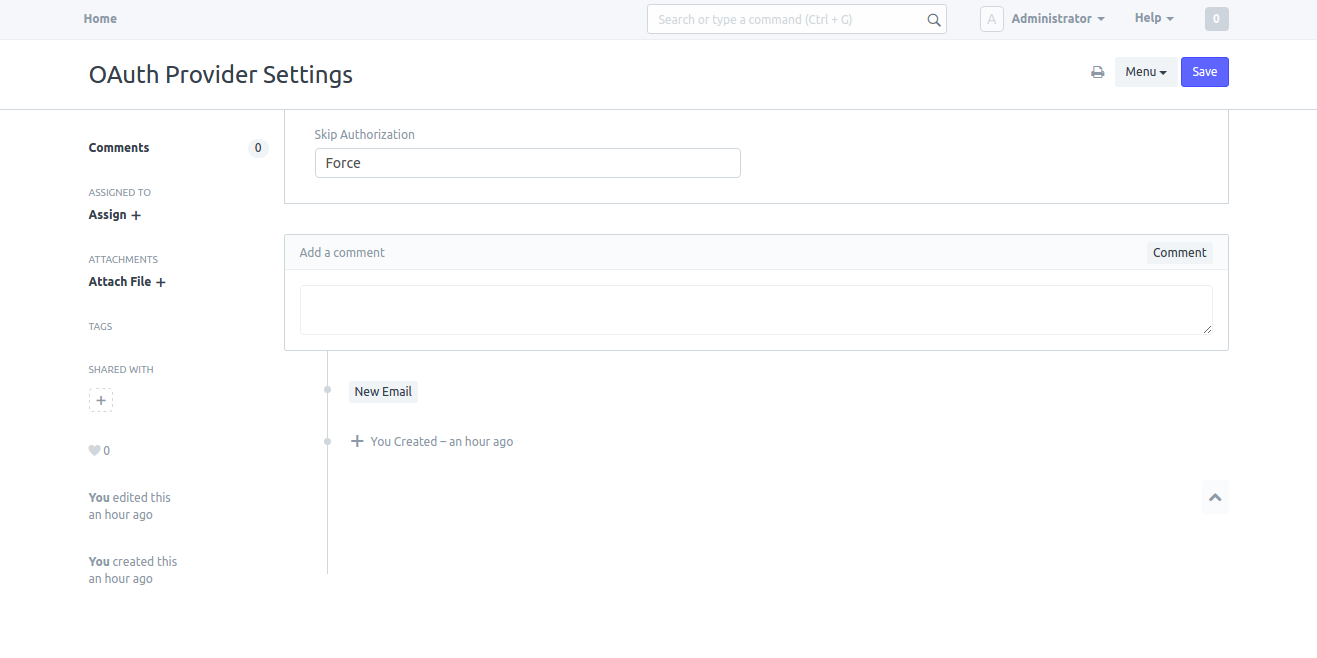
System Managers can setup behavior of confirmation message as Force or Auto in OAuth Provider Settings. If Force is selected the system will always ask for user's confirmation. If Auto is selected system asks for the confirmation only if there are no active tokens for the user.
Go to Setup > Integrations > OAuth Provider Settings
Add Primary Server
This is the main server hosting all the users. e.g. https://frappe.io. To setup this as the main server, go to Setup > Integrations > Social Login Key and add new Frappe Social Login Key. Enter https://frappe.io in the field Base URL. This URL repeats in all other Frappe servers who connect to this server to authenticate. Effectively, this is the main Identity Provider (IDP).
Under this server add as many OAuth Client(s) as required.
Add a Client App
As a System Manager go to Setup > Integrations > OAuth Client
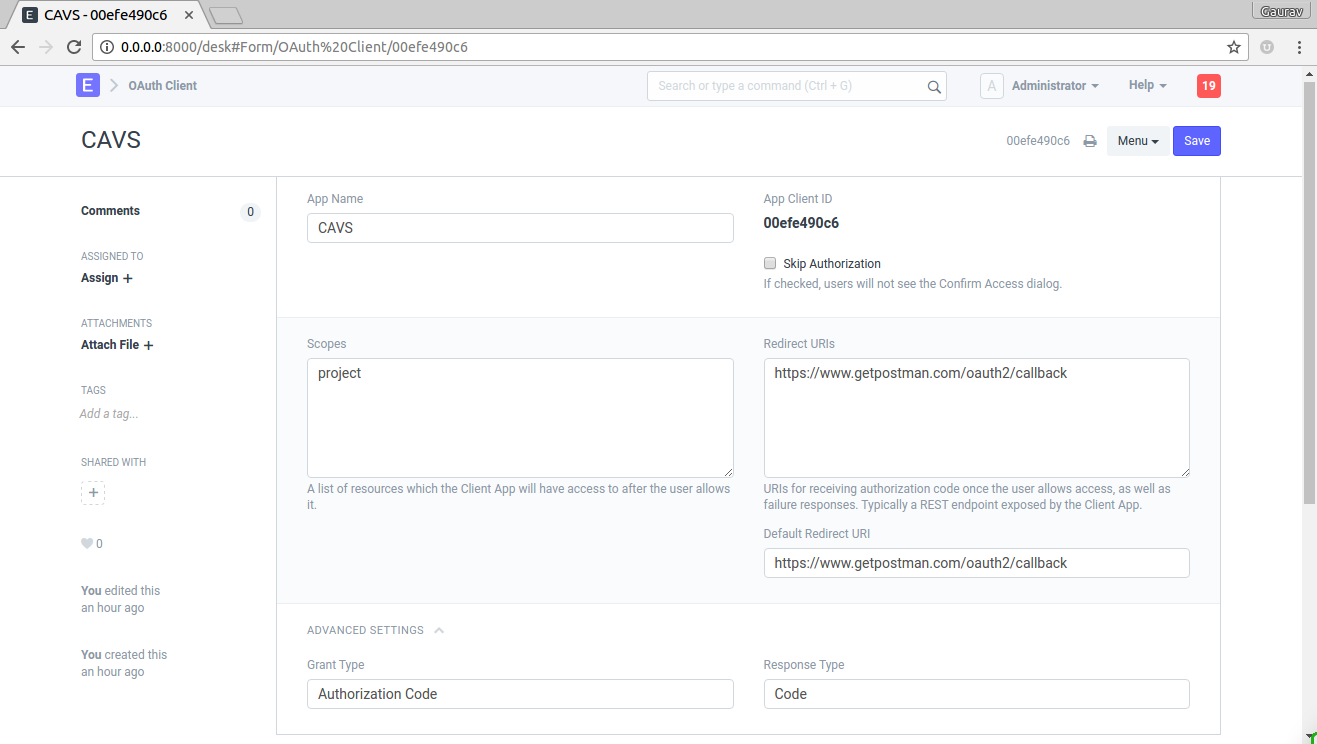
To add a client fill in the following details
App Name : Enter App Name e.g. CAVS
Skip Authorization : If this is checked, during authentication there won't be me any confirmation message. Skip Authorization means the client is treated as trusted client.
Scopes : List of scopes shown to user along with confirmation message. scopes are separated by space.
Redirect URIs : List of Redirect URIs separated by space.
Default Redirect URIs : Default Redirect URI from list of Redirect URIs
Grant Type: select
Authorization CodeorImplicit.Response Type: select
Codeif grant type isAuthorization Codeor selectToken.
Using OAuth
Use the header Authorization: Bearer <access_token> to perform authenticated requests. You can receive a bearer token by combining the following two requests.
Here is an amazing introduction to OAuth: OAuth 2.0 and OpenID Connect (in plain English)
GET /api/method/frappe.integrations.oauth2.authorize
Get an authorization code from the user to access ERPNext on his behalf.
Params (in query):
client_id (string)
ID of your OAuth2 application
state (string)
Arbitrary value used by your client application to maintain state between the request and callback. The authorization server includes this value when redirecting the user-agent back to the client. The parameter should be used for preventing cross-site request forgery.
response_type (string)
"code"
scope (string)
The scope of access that should be granted to your application.
redirect_uri (string)
Callback URI that the user will be redirected to, after the application is authorized. The authorization code can then be extracted from the params.
code_challenge_method (string)
(OPTIONAL) Can be one from
s256orplain.code_challenge (string)
(OPTIONAL) Can be
base64encode(sha256(random_string))in casecode_challenge_method=s256orrandom_stringin casecode_challenge_method=plain. Reference: https://tools.ietf.org/html/rfc7636#appendix-A
Example:
curl -X POST https://{your frappe instance}/api/method/frappe.integrations.oauth2.authorize \
     --data-urlencode 'client_id=511cb2ac2d' \
     --data-urlencode 'state=444' \
     # base64encode(sha256('420')) => 21XaP8MJjpxCMRxgEzBP82sZ73PRLqkyBUta1R309J0
     # --data-urlencode 'code_verifier=21XaP8MJjpxCMRxgEzBP82sZ73PRLqkyBUta1R309J0' \
     --data-urlencode 'response_type=code'
     --data-urlencode 'scope=openid%20all' \
     --data-urlencode 'redirect_uri=https://app.getpostman.com/oauth2/callback'
Returns:
HTTP Code: 200
text/html
This will open the authorize page which then redirects you to the
redirect_uri.
If the user clicks 'Allow', the redirect URI will be called with an authorization code in the query parameters:
https://{redirect uri}?code=plkj2mqDLwaLJAgDBAkyR1W8Co08Ud&state=444
If user clicks 'Deny' you will receive an error:
https://{redirect uri}?error=access_denied
Token Exchange for Authorization Code Grant with ID Token
POST /api/method/frappe.integrations.oauth2.get_token
Header Content-Type: application/x-www-form-urlencoded
Note: This endpoint can also be used to get a refreshed access token. Just send the
refresh_tokenin the request body.
Trade the authorization code (obtained above) for an access token.
Params (in body):
grant_type (string)
"authorization_code"
code (string)
Authorization code received in redirect URI.
client_id (string)
ID of your OAuth2 application
redirect_uri (string)
Registered redirect URI of client app
Example:
curl -X POST https://{your_instance}/api/method/frappe.integrations.oauth2.get_token \
     -H 'Content-Type: application/x-www-form-urlencoded' \
     -H 'Accept: application/json' \
     -d 'grant_type=authorization_code&code=wa1YuQMff2ZXEAu2ZBHLpJRQXcGZdr
         &redirect_uri=https%3A%2F%2Fapp.getpostman.com%2Foauth2%2Fcallback&client_id=af615c2d3a'
For testing purposes you can also pass the parameters in the URL like this (and open it in the browser):
https://{your_instance}/api/method/frappe.integrations.oauth2.get_token?grant_type=authorization_code&code=A1KBRoYAN1uxrLAcdGLmvPKsRQLvzj&client_id=511cb2ac2d&redirect_uri=https%3A%2F%2Fapp.getpostman.com%2Foauth2%2Fcallback
Returns:
    {
        "access_token": "pNO2DpTMHTcFHYUXwzs74k6idQBmnI",
        "token_type": "Bearer",
        "expires_in": 3600,
        "refresh_token": "cp74cxbbDgaxFuUZ8Usc7egYlhKbH1",
        "scope": "openid all",
        "id_token": "eyJhbGciOiJIUzI1NiIsInR5cCI6IkpXVCJ9.eyJzdWIiOiIxMjM0NTY3ODkwIiwibmFtZSI6IkpvaG4gRG9lIiwiaWF0IjoxNTE2MjM5MDIyfQ.XbPfbIHMI6arZ3Y922BhjWgQzWXcXNrz0ogtVhfEd2o"
    }
Token Exchange for Authorization Code Grant with ID Token (PKCE)
POST /api/method/frappe.integrations.oauth2.get_token
Header Content-Type: application/x-www-form-urlencoded
Trade the authorization code (obtained above) for an access token.
Params (in body):
grant_type (string)
"authorization_code"
code (string)
Authorization code received in redirect URI.
client_id (string)
ID of your OAuth2 application
redirect_uri (string)
Registered redirect URI of client app
code_verifier (string)
random_stringused duringAuthorization Requestwithcode_challenge_methodandcode_challenge.
Content-Type: application/x-www-form-urlencoded
Example:
curl -X POST https://{your_instance}/api/method/frappe.integrations.oauth2.get_token \
     -H 'Content-Type: application/x-www-form-urlencoded' \
     -H 'Accept: application/json' \
     -d 'grant_type=authorization_code&code=wa1YuQMff2ZXEAu2ZBHLpJRQXcGZdr
         &redirect_uri=https%3A%2F%2Fapp.getpostman.com%2Foauth2%2Fcallback&client_id=af615c2d3a&code_verifier=420'
For testing purposes you can also pass the parameters in the URL like this (and open it in the browser):
https://{your_instance}/api/method/frappe.integrations.oauth2.get_token?grant_type=authorization_code&code=A1KBRoYAN1uxrLAcdGLmvPKsRQLvzj&client_id=511cb2ac2d&redirect_uri=https%3A%2F%2Fapp.getpostman.com%2Foauth2%2Fcallback&code_verifier=420
Returns:
{
    "access_token": "pNO2DpTMHTcFHYUXwzs74k6idQBmnI",
    "token_type": "Bearer",
    "expires_in": 3600,
    "refresh_token": "cp74cxbbDgaxFuUZ8Usc7egYlhKbH1",
    "scope": "openid all",
    "id_token": "eyJhbGciOiJIUzI1NiIsInR5cCI6IkpXVCJ9.eyJzdWIiOiIxMjM0NTY3ODkwIiwibmFtZSI6IkpvaG4gRG9lIiwiaWF0IjoxNTE2MjM5MDIyfQ.XbPfbIHMI6arZ3Y922BhjWgQzWXcXNrz0ogtVhfEd2o"
}
Revoke Token Endpoint
POST /api/method/frappe.integrations.oauth2.revoke_token
Header: Content-Type: application/x-www-form-urlencoded
Revoke token endpoint.
Params:
token
Access token to be revoked.
Returns:
Always returns empty response with HTTP status code 200.
{}Open ID Connect id_token
ID Token is a JWT.
audclaim has registeredclient_id.issclaim has Server URL.subclaim has User's userid.rolesclaim has user roles.expclaim has expiration time.iatclaim has issued at time.
Example: eyJhbGciOiJIUzI1NiIsInR5cCI6IkpXVCJ9.eyJzdWIiOiIxMjM0NTY3ODkwIiwibmFtZSI6IkouIERvZSIsImVtYWlsIjoiakBkb2UuY29tIiwiaWF0IjoxNTE2MjM5MDIyLCJleHAiOjE1MTYyNDIwMjIsImF1ZCI6ImNsaWVudF9pZCJ9.ZEdnrHjLbArahVTN19b4zoRFoBO5a2BakRkR82O1VU8
Verify and extract it with PyJWT.
import jwt

id_token = "eyJhbGciOiJIUzI1NiIsInR5cCI6IkpXVCJ9.eyJzdWIiOiIxMjM0NTY3ODkwIiwibmFtZSI6IkouIERvZSIsImVtYWlsIjoiakBkb2UuY29tIiwiaWF0IjoxNTE2MjM5MDIyLCJleHAiOjE1MTYyNDIwMjIsImF1ZCI6ImNsaWVudF9pZCIsInJvbGVzIjpbIlN5c3RlbSBNYW5hZ2VyIiwiU2FsZXMgTWFuYWdlciJdLCJub25jZSI6Ijc4OTEyMyIsImlzcyI6Imh0dHBzOi8vZXJwLmV4YW1wbGUuY29tIn0.F8Wbh5dtD1loZPltJLj_sqF9DZNeBvEbo-ITtf3UPqk"

client_id = 'client_id'
client_secret = 'client_secret'

payload = jwt.decode(
    id_token,
    audience=client_id,
    key=client_secret,
    algorithm="HS256",
    options={"verify_exp": False}, # Enabled by default to verify expiration time
)

print(payload)
# Output

{'sub': '1234567890', 'name': 'J. Doe', 'email': 'j@doe.com', 'iat': 1516239022, 'exp': 1516242022, 'aud': 'client_id', 'roles': ['System Manager', 'Sales Manager'], 'nonce': '789123', 'iss': 'https://erp.example.com'}
OpenID User Info Endpoint
Request
GET /api/method/frappe.integrations.oauth2.openid_profile
Header: Authorization: Bearer valid_access_token
Response
{
    "sub": "1234567890",
    "name": "J. Doe",
    "given_name": "J",
    "family_name": "Doe",
    "iss": "https://erp.example.com",
    "picture": "https://erp.example.com/files/jdoe.jpg",
    "email": "j@doe.com",
    "iat": 1516239022,
    "exp": 1516242022,
    "aud": "client_id",
    "roles": ["System Manager", "Sales Manager"]
}
Introspect Token Endpoint
POST /api/method/frappe.integrations.oauth2.introspect_token
Header: Content-Type: application/x-www-form-urlencoded
Revoke token endpoint.
Params:
tokentypehint
access_tokenorrefresh_token, defaults toaccess_tokenif nothing is providedtoken
Access token or Refresh Token to be introspected. Depends on tokentypehint
Returns:
{
    "client_id": "511cb2ac2d",
    "trusted_client": 1,
    "active": true,
    "exp": 1619523326,
    "scope": "openid all",
    "sub": "1234567890",
    "name": "J. Doe",
    "given_name": "J",
    "family_name": "Doe",
    "iss": "https://erp.example.com",
    "picture": "https://erp.example.com/files/jdoe.jpg",
    "email": "j@doe.com",
    "iat": 1516239022,
    "exp": 1516242022,
    "aud": "511cb2ac2d",
    "roles": ["System Manager", "Sales Manager"]
}
OR
{
    "active": false,
    "_server_messages": "..."
}